
Ticket Attachments is a feature in Qualtrics that lets you upload files directly to a ticket, so documents, screenshots, and photos stay with the record instead of scattered across email threads.
Example: A constituent submits a damage claim form with a photo of the damage. The response creates a ticket, and the reviewer adds the inspection report and the signed approval to that same ticket. Every document tied to the claim lives on the record.
Benefits of Using Ticket Attachments
Attaching files to the ticket keeps the full picture of a request in one place, which makes a difference the moment someone other than the original owner has to pick it up.
Using ticket attachments offers several key advantages:
- One source of truth: Everything tied to a request lives on the ticket
- Better handoffs: Escalations and coverage do not lose context
- Simpler auditing: Supporting documents sit on the record, not in a mailbox
- Fewer dead ends: Anyone with view access can open the same files
Why Use Ticket Attachments?
Attachments give your team the evidence and paperwork alongside the request itself, so reviewers are not forwarding email chains to find a single photo or signed form.
When Should You Use It?
Use Ticket Attachments anytime a request needs supporting documentation to be resolved, gets reviewed by more than one person, or has to be defensible later. It is especially useful for processes that already run on paperwork.
Attachments are particularly effective in these scenarios:
- Claims and applications: Photos, receipts, or forms submitted with a request
- Inspections and reviews: Reports and findings added by staff after the ticket opens
- Approvals: Signed documents attached to the record that authorized them
- Follow-up correspondence: Files a constituent sends in later as part of the same case
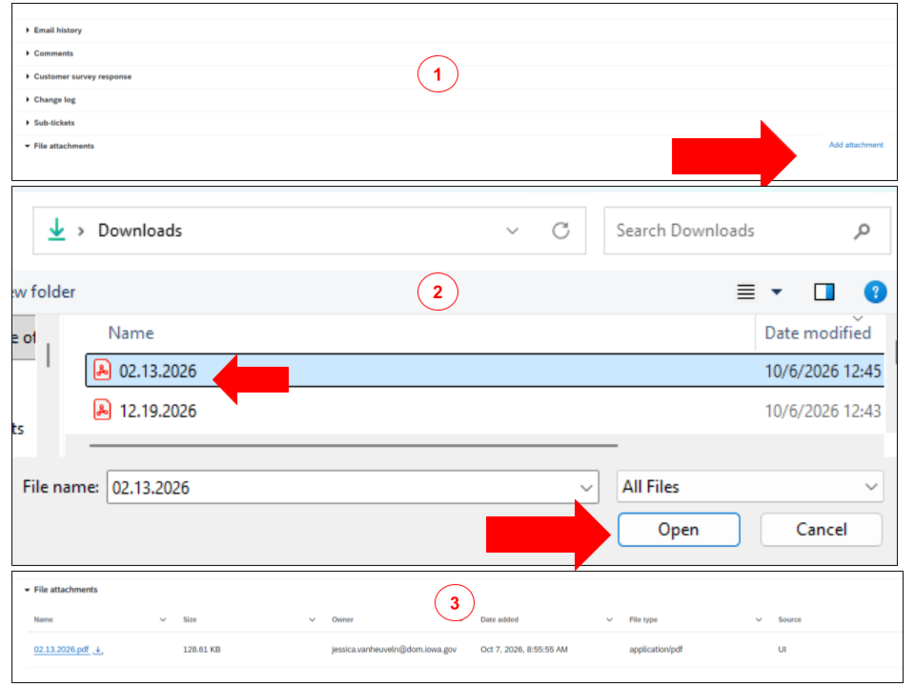
Adding an Attachment in Three Steps.
- Open the ticket: Locate the ticket you want to add files to.
- Find the File Attachments row: Once attachments are enabled for your brand, this row appears on the ticket.
- Note: Ticket owners, users with edit access to the ticket, and brand administrators are able to upload files.
- Click Add Attachment: Upload your file, and anyone with permission to view the ticket can open it.
Attachment Guidelines
Before you build your ticket process around attachments, know the limits:
- Maximum file count: Up to 10 files per ticket
- File size limit: 25MB per individual file
- Allowed file types: BMP, GIF, JPEG, PDF, DOCX, XLSX, CSV, HEIC, PNG, ZIP, and media files like MP3 and MOV
- Note: Files attached to ticket emails land in the same table. Anything you attach to an outbound email sent from the ticket appears in File Attachments once you send it, and if your brand has inbound email capture turned on, files someone sends back in a reply do too.
Workaround for the 10-file limit: ZIP is an allowed file type, so if a request needs more than 10 files, bundle them into a single ZIP and upload that instead. The bundle takes up one slot rather than ten. Two things to keep in mind: the ZIP still has to come in under the 25MB limit, and anyone who needs one file from it has to download and extract the whole bundle instead of opening it from the ticket. It works well for archival documentation and less well for files your team opens often.