Purpose
A Promo is a standard promotional piece often characterized by its use of a call to action. Typically, it's made up of a title, accompanying text, an optional image, and a link with both a label and URL.
When to use
Here are some great promotion ideas:
- Use catchy calls to action, like Subscribe to our Newsletter.
- Try Meet our Team for a personal touch.
Staff members should think about creating different promotions, like a Site-wide Promotion. This helps keep visibility steady across all locations and allows for regular updates.
Note: You can only use Video Promos for Landing pages. You cannot embed them into other content types.
Elements of Promos
- Intro title: Small intro heading, optional, 35-character limit
- Title: Title of promo, 75-character limit with option to hide title
- Description: Brief description, limited to 200 characters
- Link URL: URL of page where information regarding the promo can be found
- Link text: Content limited to 50 characters
- Image: Image to appear with Promo
Login to your site
Make sure you are logged on to the VPN first.
You can login to your site from your Okta tile or login.iowa.gov.
Each person on your agency team has a specific user role for the website. These roles set permissions. They control who can write, edit, review, or publish content. You can ask for a role change or remove a role.
Submit a ServiceDesk Plus support ticket if you need help.
Create a new Promo content type
Create a new Promo by navigating to Content > Add Microcontent > Promo.
When creating a content type, make sure to add all required fields.
We recommend you click Save often.
First, create your new Promo by adding the text, link, and image (if desired).
Once your Promo is created and saved, you're ready to add it to your Basic page or Landing page.
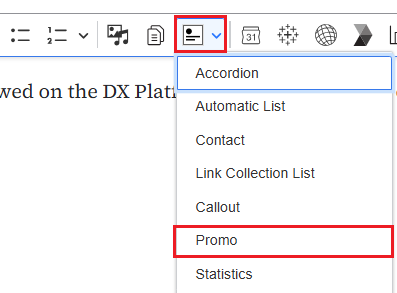
To insert your previously created Promo on a Basic page, select the Insert Component icon from the WYSIWIG toolbar, and select Promo. Then choose your previously created Promo.
To add your Promo to a Landing page, create and save your Landing page. Then click the Layout link on the menu at the top of the page. Click the Add section link. On the right side of the page, choose your background color for this new section - you can choose White, Light, or Dark. Now choose an Administrative label (this is a title only you can see for reference) and click the Add section button.
You'll see your new section under your Administrative label with the words +Add block. Click Add block. On the right side you'll see a menu titled Choose Block. Choose the type of block you want to add. In this case, choose Promo. Click Add Promo. A pop-up widow will open. Select Promo Library at the top, since you're already created your Promo. You could create it from here if you'd like.
Choose your previously created Promo, scroll down to the bottom, and click the Select button.
On the right-side menu, you'll see the title of the Promo you chose. In the dropdown box, choose how you would like the Promo to appear - Image Left, Image Right, Text Only, etc. Once you've chosen your layout, select the Insert Block button.
Scroll up and select the large Save Layout button.
You can edit your Promo in your Content Library by searching under Microcontent for Promo. If you want to edit the layout of the Promo on your Basic page or Landing page, instead of choosing the Edit button, choose the Layout button. Scroll to the Promo. In the top right corner of the Promo, you'll see a small pencil icon. Click the pencil and select Configure. A menu will open on the right side. Choose the Edit button. Be sure you select Save Layout before you leave the page.
Common placements of Microcontent
| Type of Microcontent | Landing Page | Basic Page |
|---|---|---|
| Promo | Can be placed | Can be placed |
| Video Promo | Can be placed | N/A |
| Accordion | N/A | Can be placed |
| Link Collection List | Can be placed | Can be placed |
| Visual Link Collection | Can be placed | N/A |
| Statistic | Can be placed | Can be placed |
| Automatic List | Can be placed | Can be placed |
| Contact | N/A | Can be placed |
| Document | N/A | Can be placed |
Confirm your knowledge
Check out our YouTube video training page for step-by-step visual help with your website.